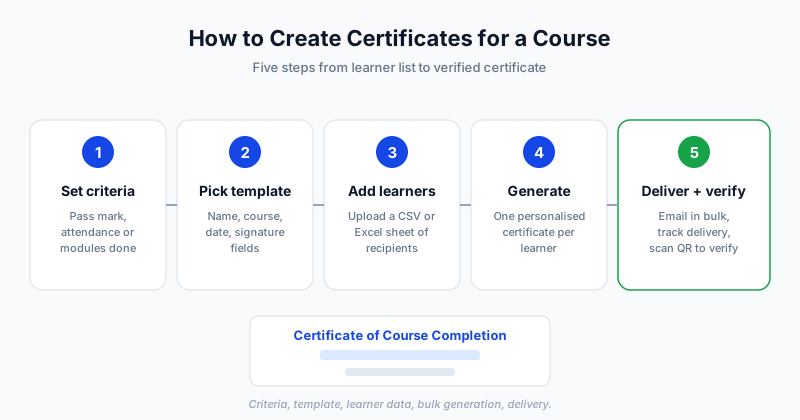
To create certificates for a course, decide who qualifies, choose a clean template, add personalised fields (learner name, course title, date, signature), then generate and deliver one certificate per learner. For a handful of students you can do that by hand. For a real cohort, a spreadsheet and a bulk tool turn hours of editing into minutes.
This guide walks through the whole process, from deciding what your course completion certificates should say to delivering and verifying them.
What to Put on a Course Certificate
A certification of course completion works best when it is short, accurate and easy to check. Include these elements:
- Learner's full name - the most prominent line, spelled exactly as the learner registered it.
- Course title - the real name of the course, not a vague "training programme".
- Issuing organization - your name and logo.
- Completion date - the date the learner met the criteria, not the date you made the certificate.
- Duration or hours - optional, but useful for CPD and employer records.
- Signature and name of the signatory - a real, named person such as the instructor or director.
- Certificate ID and QR code - so the certificate can be verified later.
A one-line summary of what the learner studied (for example, "covering budgeting, forecasting and reporting") gives the certificate more weight than a title alone. For the full anatomy, see our certificate of completion guide.
Set Completion Criteria First
Before you design anything, decide what earns a completion of course certificate. Vague rules lead to arguments later. Common criteria:
- Finished a set percentage of lessons or modules
- Attended a minimum number of live sessions
- Passed a final quiz or assignment with a set score
- Submitted a project
Write the rule down and tell learners at the start. If completion is simply finishing the content, say so. If there is a pass mark, say that too. Clear criteria also decide whether you issue a completion certificate or something stronger, which is covered in certificate of attendance vs completion.
Design the Certificate
Good design is mostly restraint. A learner should see the name and course in two seconds.
- Pick one layout and orientation. Landscape is standard for certificates.
- Use your brand colours and logo, but keep a calm white or light background.
- Use two fonts at most: one for headings, one for body text.
- Make the learner's name the largest text after the title.
- Leave space around the signature and QR code.
Starting from a ready-made layout saves time. Our online course certificate templates post shows layouts that suit courses, and how to design professional certificates covers the finer points.
Sample Wording for a Course Certificate
This certifies that [Learner Name] has successfully completed [Course Title], a [X]-hour course delivered by [Organization Name], on [Date].
A warmer version for a community or short course:
Congratulations to [Learner Name] on completing [Course Title]. Thank you for your effort and commitment throughout the course.
You can see many more options in certificate wording examples.
Creating Certificates One by One vs in Bulk
Both methods work. The right one depends on how many learners you have.
| One by one | In bulk | |
|---|---|---|
| Best for | A few learners, one-off courses | Cohorts, ongoing courses, many learners |
| How it works | Edit a design file, change the name, export, send | Upload a spreadsheet, fields fill automatically |
| Risk | Typos, wrong names, forgotten learners | Low, if the spreadsheet is accurate |
| Time | Several minutes per learner | Minutes for the whole batch |
If you create certificates by hand, keep one master file and always "save as" a new copy. If you have more than about ten learners, move to bulk. Our guide on generating certificates from a CSV explains the spreadsheet setup.
The Bulk Workflow in Five Steps
- Export a list of learners who met the criteria, with columns for name, email and completion date.
- Check names for spelling and capitalisation.
- Upload the CSV or Excel file and map the columns to the certificate fields.
- Preview a few certificates to confirm nothing is cut off.
- Generate and send to everyone at once.
Delivering and Verifying Certificates
A certificate that never reaches the learner is wasted effort. Email delivery works best, because the learner can keep the file, add it to LinkedIn or forward it to an employer. Send it soon after completion, while the achievement is fresh, and use a clear subject line such as "Your certificate for [Course Title]".
Delivery tracking helps you spot bounced addresses so you can resend. For tips on getting emails to land in inboxes, read certificate email delivery best practices.
Verification is what makes a course certificate credible. A unique ID plus a QR code lets an employer or admissions officer confirm it in seconds. Learn how this works in QR-verified certificates.
Mistakes to Avoid
- Issuing a certificate before the learner actually met the criteria
- Spelling names wrongly or using nicknames
- Skipping the date, which makes the certificate hard to trust
- Using a different layout for every cohort
- Having no way to verify or reissue a certificate
Getting Started
If your course already has a learner list, you can have certificates ready today. SendCertificates lets you choose a template, upload a spreadsheet of recipients, add name, course and date fields, and email personalised, QR-verifiable certificates in bulk with delivery tracking. You can create your free account and start with 50 free credits. If you want a ready-made starting point for courses, see our course completion certificate page.
Related Guides
Tags