To generate certificates for event participants, export your confirmed attendee list into a spreadsheet, clean it, choose one template with merge fields for the name and event details, and use a bulk tool to fill and email every certificate at once. The same steps work for an in-person meetup, a multi-day conference or a one-hour webinar. What changes is how you confirm who actually attended.
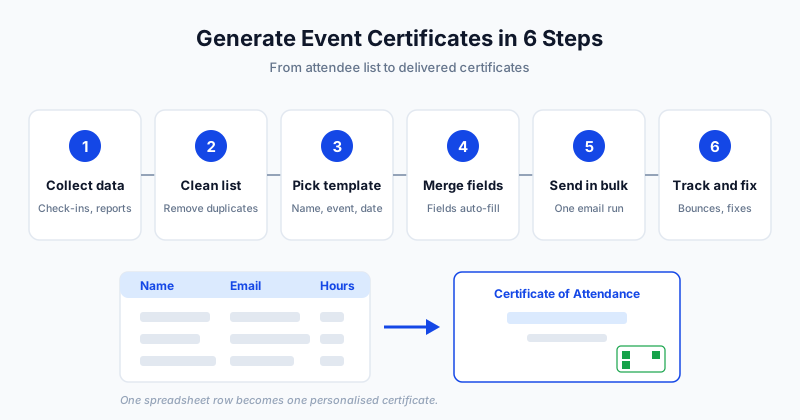
Step 1: Collect Attendee Data
Your registration system is the starting point, but registration is not attendance. Build the list from the best evidence you have of who showed up:
- In-person events: check-in sheets, badge scans or a QR check-in export.
- Conferences: session scan logs, or a final badge-collection list. If you certify individual sessions, keep a separate list per session.
- Webinars: the attendance report from your webinar platform, which usually shows join time, leave time and duration.
Export everything to CSV or Excel. At minimum you need a full name and an email address. Add columns for anything you want printed on the certificate, such as session title, hours attended or role (speaker, volunteer, delegate).
Step 2: Clean the List
A clean list prevents most of the problems people run into later. Before you upload anything:
- Remove no-shows and anyone who left within minutes of joining.
- Merge duplicates. Webinar reports often list one person several times if they dropped and rejoined.
- Fix capitalization. "jOHN smith" on a certificate looks careless. Use proper case.
- Check email addresses for typos such as a missing letter in the domain.
- Confirm name spelling for people who registered with a nickname or a work alias.
- Apply your attendance rule, for example 75 percent of the session duration, and add a column that records the result.
Keep one header row with simple names like Name, Email, Event, Date. You will map these to template fields in a moment.
Step 3: Choose a Template
Pick a design that fits the event and the weight of the document. A community meetup can be relaxed; a professional conference needs a formal layout with a signature. If you are unsure which type of document you need, our guide to the certificate of attendance explains how it differs from a certificate of completion or participation.
Whatever the style, include:
- Participant name (the most prominent element)
- Event name, date and format
- Organizer name and logo
- Hours, if the event offers professional development credit
- Authorized signature
- Certificate ID or QR code for verification
For a deeper walkthrough of layout and wording choices, see the event certificate guide.
Step 4: Merge Fields Into the Template
Mail merge for certificates means the template has placeholders and your spreadsheet supplies the values. A typical set looks like this:
| Spreadsheet column | Template field |
|---|---|
| Name | Participant name |
| Event | Event title |
| Date | Event date |
| Hours | Hours attended |
| Role | Delegate, speaker or volunteer |
Always preview three or four certificates before sending: the shortest name, the longest name and one with special characters. Long names that wrap or shrink are the most common layout failure. If you need a refresher on the file format, the guide to generating certificates from CSV covers column setup in detail.
Step 5: Send in Bulk
With the data merged, send every certificate by email in one run rather than attaching files by hand. Good practice for the email itself:
- A clear subject line, such as "Your certificate for [Event Name]".
- A short body that names the event and tells people what to do if something is wrong.
- A sender name recipients recognize, so the message does not look like spam.
If you want to go deeper on delivery, our guide to sending bulk certificates covers sending in batches and timing. Send within 24 to 48 hours of the event, while people still remember it and are likely to look for the email.
Step 6: Track Delivery and Handle Corrections
Sending is not the end. Check which emails were delivered, which bounced and which were never opened. Bounces almost always come from a typo in the address, so fix the row and resend. For people who say they never received anything, ask them to check spam, then resend to the corrected address.
Corrections will happen. Someone's name is misspelled, a speaker was listed as a delegate, or an attendee missed the list. Handle them the same way each time:
- Fix the row in your master spreadsheet.
- Regenerate only that certificate.
- Resend it with a short note.
Because your spreadsheet is the single source of truth, nothing needs to be redesigned.
In-Person vs Conference vs Webinar
| Event type | Best attendance proof | Watch out for |
|---|---|---|
| In-person event | Check-in list or badge scans | Walk-ins missing from registration |
| Multi-day conference | Session scan logs | Separate certificates per day or per session |
| Webinar | Platform attendance report | Duplicate rows, short stays, shared logins |
For webinars specifically, the workflow can be almost entirely automated. Our post on webinar certificates and automated issuance shows how to turn the attendance report into certificates with minimal manual work. If your event is hands-on and training based, the workshop certificates page shows templates built for that format.
Common Mistakes to Avoid
- Certifying everyone who registered, instead of everyone who attended.
- Skipping the preview and discovering a clipped name after 300 emails are sent.
- Sending from a no-reply address with no way to ask for a correction.
- Using a different template for each speaker, which makes records hard to manage.
- Forgetting verification, which leaves your certificates easy to fake.
Getting Started
If you run events regularly, the goal is a process you can repeat in under an hour. SendCertificates lets you pick a template, upload your attendee spreadsheet, send personalised certificates by email with a QR code for verification, and track delivery. You can create a free account and try it with 50 free credits on your next event.
Related Guides
Tags